Posted on

Fabrics

The fabric you use as the base for your embroidery forms an integral part of the overall design and should be chosen with thought and imagination.  If you were guided by the embroidery police you would be restricted to fabrics that were available in and around the 17th and 18th centuries.  That would be a pity.  I tend to draw the line at synthetic fabrics, but other than that I will use whatever takes my fancy, or whatever suits the design and the function of the finished article.
Like many embroiderers who have been at it for years, my walls are full of framed embroidery, so I tend to make other things, mostly for my home.  This requires that I need medium to heavy weight fabrics.  As a Jacobean/Crewel embroiderer, if I was sticking to rules I would be surfing the net and having linen twill delivered to my door.  Why?  It’s hard to find, the colour range is a little narrow and there is so much other fabric out there that does the job just as well and, in many cases, better. Besides, living at the bottom tip of Africa in a society that tries to extract as much as possible from the productive in order to hand it over to the unproductive so that they can reproduce with impunity, customs duty is huge, and let’s not even get onto the cost of shipping to the bottom of the world. 
 A lot of countries have a textile industry that produces all sorts of fabrics that are the equivalents of fabrics that are produced elsewhere, but have different names.  We have a fabric here called “bull denim”, a name which suggests all sorts of other uses.  It is available in just about any colour you want and on closer inspection I found that it is actually cotton twill.  A really nice quality twill too.  It is available in the more traditional weave with diagonal ridges and I have purchased it with a box weave as well.  The design below was worked on this fabric, it was a pleasure to work with, very stable and it washed like a dream. 

Somewhere out there are people that say you shouldn’t wash your embroidery because you shouldn’t get it grubby in the first place.  I’ll discuss that at length another day.  All I’m going to say today is that I live a life surrounded by dogs who get patted, stroked and hugged with the same hands that do the stitching.  Hands that are attached to a real human being that has natural oils and whose home is not a sterile environment.   My embroidery gets washed.  End of story.
Another fabric that is ideal for textured embroidery is a heavy weight seedcloth.  This is a woven cotton fabric, often used for table cloths, and is Ecru in colour.  The charm, and what gives it its name, is that the cotton seed husks have not been bleached out.  They are visible, but not intrusive.  The little number below was worked on seed cloth.

My favourite fabric for Jacobean embroidery is called “hopsack”.  I would imagine that the hops that are used in the making of the beer that keeps millions of men moderately sedated every day, are now harvested with some sort of large agricultural machine, but in days gone by they were collected in sacks that were made of linen.   As its name suggests this fabric, although a pure cotton, is reminiscent of the material used to make those hopsacks.   It has an even weave with a count of 30 threads per inch and is a stable medium weight fabric.
The image below is a portion of one of the designs in my book, “Crewel Twists”.  It was stitched on hopsack.

There is no doubt that embroidery worked on pure silk is exquisite, but I do think that, as an embroidery fabric, it is over rated.  It is delicate, not that well suited to heavily textured stitchery and, if you are using a dyed silk, the colour runs when you wash it.   It is dyed with vegetable dyes and those, by their very nature, are not colour fast.  Even if you are not grappling with the colour-fast problem, it doesn’t wash well, losing some of its lustre, and it is prone to watermarks.  But it is lovely and I will often use it for something that is going to be displayed behind glass.  The image below is a small cameo that forms part of a set of five, all of which will ultimately be framed behind glass and hung on the wall.

Before I traced the lines of the embroidery design onto the silk, I rinsed it in tepid water a few times to get rid of as much excess dye as I could.  I also backed the fabric with cotton voile.
I always back my fabric with cotton voile, unless it going to be made into something that can do without the extra bulk.  It stabilises the fabric and also gives you something to start and end off in.
Having said at the beginning of this post that I tend to draw the line at synthetic fabrics, I sometimes do use them.  A few years ago I went through a bag-making period.  Wanting to make useful handbags that could be used daily, I needed a substantial and strong fabric.  My bench mark was whether it would stand up to taking the dogs to the vet.  I went off to all sorts of fabric emporia, stared at everything, touched most of it, rubbed it between my fingers and eventually chose a mock-suede upholstery fabric.  I don’t think that this fabric had seen a natural fibre in its life, but it was perfect for what I had in mind. 

It wasn’t particularly easy to stitch on this fabric, but it wasn’t impossible either.  I used thicker needles than I usually do for the thread embroidery. 

I would usually use a short beading needle for bead embroidery stitches but found, on this fabric, that I needed to use a long needle for extra leverage. 
There are times that I pick up a fabric with no particular design or project in mind.  I buy it because I like the texture or the colour.  Those are often the best fabrics because they inspire you to design something that suits the fabric.  The two stumpwork designs below were designed in those circumstances. 
Both fabrics were originally intended for soft furnishings and I honestly don’t know and can’t remember whether they had a synthetic component, but you can be fairly certain that they did. 

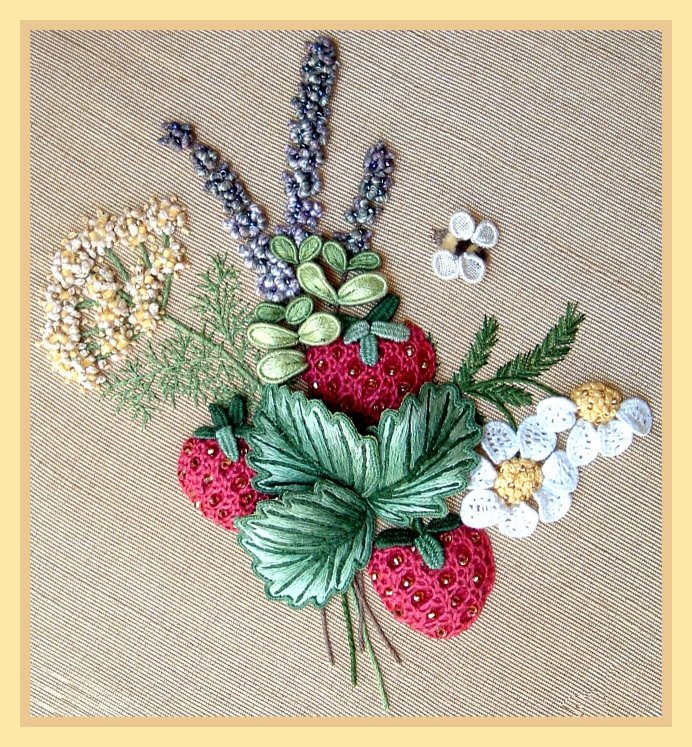
I loved the embossed design on the first fabric and was attracted to both the sheen and the colour of the second.
And then there is quilting fabric.  Like all needle craft supplies, there is good quality fabric and there is rubbish.  I go for the pure cotton American quilting fabric which works really well and I always back it with cotton voile to give it extra stability.  I’ve always like the idea of working a design onto a fabric that has an existing print.  It provides extra interest and is something that I haven’t explored enough.  I intend to do a lot more but in the meantime, the brick doorstop that is in my “Crewel Twists” book was done on a dark print.


When you start working on printed backgrounds you find the choice of thread colours can be challenging but you soon get into it and I have always been pleased with how the project turns out.
So, in line with my original stated intention to attempt to debunk some of the myths that surround hand embroidery, take note of what the embroidery police say you should be using and then use what inspires you.  I don’t do much canvas work and neither do I have enough time to get down to doing more of the even weave embroideries.  I will be the first one to tell you that if you do, then you should probably use the real thing – the fabrics that are recommended for these styles. 
If, however, you are doing anything from Jacobean to Silk Ribbon embroidery, from Stumpwork to even Goldwork, there is no need to be stuck in the past.   Look at the upholstery fabrics, the quilting fabrics, taffetas and silks.  Use what you like and if it needs stability, back it with cotton voile and enjoy the result. The Mother Grundies will disapprove, but I do promise you that there will be far more admirers than detractors. 
Dress designers embroider on any and every fabric.  Shouldn’t those of us who do it for pleasure follow their lead?  
Posted on

More Needle Lace

As I predicted, the naughty dogs’ situation took up rather a lot of my time last week and left me with no inspiration to write anything.  More about that later, for now let’s get back to using needle lace techniques in your embroidery.
One of the joys of hand embroidery is that as it takes a while to do, your mind wanders while you are stitching.  Well, not if there’s something worth watching on the television, but despite the fact that we have a satellite dish on our chimney and, apparently, a hundred-and-something channels at our disposal, there’s not that much on the telly that’s new.  Too many repeats, even the news channels repeat themselves every 20 minutes.  Which, is why the mind wanders.  While it’s wandering mine thinks of future projects, things that might be interesting to try out, things to invent and so on.
I have no interest in quilting – been there done that, made a quilt for every bed in the house and then moved on.  I do, however, fancy the idea of crazy patch because of the endless possibilities for embroidery.  For ages I’d been thinking of embarking on a project.  My main thoughts have been along the lines of ‘why stitch a scrap of lace to the thing when you can make the lace with needle lace techniques’, ‘why stitch buttons onto the crazy patch when you can work up little three-dimensional flowers or other doo-dats with beads’, why attach things that you have bought when you can make them yourself? 
Late last year I asked my quilter friend, Pat, to make me a square of crazy patch and I got started.  I’m having a lot of fun, not least because each little block is a mini-project that you need to embellish, at the same time making sure that your embellishment ties in and balances with the other blocks.  Added to that is the fact that you can use just about each and every needlework technique that you have ever learnt.  So far I’ve put silk ribbon embroidery, crewel stitches, Brazilian embroidery techniques, tatting, long and short stitch shading, bead embroidery, bead-woven flowers and butterflies, metal thread embroidery and, of course, needle lace techniques onto the project.  I’m not even half way through it, so there’s still scope for a lot more. 
But for today I want to show you a bit of the needle lace that I’ve put onto it (so far).  I’ve faded the background of the crazy patch out in each photograph, in order to concentrate on the area of lace, leaving that bold.

The lace in the picture above was my first bit.  I started out by doing the eighth needle lace stitch.   After a few rows I realised that I didn’t need to stick with just that stitch.  With a little bit of thought, I could morph into another of the stitches, then morph back into the stitch that I started with and, finally finish it off with a row that included a picot in the middle of each group.  By doing this, I ended up with a result that actually looks like a piece of lace, as opposed to just a covering of a needle lace technique.  The difference between that and a scrap of lace that has been stitched on is that it fits perfectly into the space.  You’ve also had a creative adventure working it out.
When I got to the next piece, however, I chose to do the fifth needle lace stitch.  This is one that needed to stand alone so, apart from adding a picot in the middle of each group in the last row, I kept to that stitch.

While all this stitching is happening my mind keeps wandering and somewhere along the way I decided that I needed a piece of ‘insertion’ lace.  You know what I’m talking about, the kind of lace that has a bit of ribbon threaded through it.  It was easy enough to work out.  By combining the fifth needle lace stitch with tulle bars and whipping the thread that forms the loops, I managed to come up with a piece of lace that had wide gaps that were stable enough to accommodate some 2 mm silk ribbon from Di van Niekerk’s exquisite range of hand painted silk ribbons.  
The large pink area in the photo above started life as a big, empty silk block, one that I wanted to break up a little, so that I could fill it with all sorts of different things.  I divided it in half and filled the left side with the twenty sixth needle lace stitch using a Chameleon Threads perle no. 12 which, being a space dyed thread, gave it colour and interest.  Initially, it looked a little bare but once I had surrounded it with other things, studded it with three beadwork flowers at the bottom and allowed a butterfly to hover over some of it, it created a textured background that blended in with its surrounds.
You may be wondering where I find all of these stitches, and why I refer to them with particular numbers.  Some years ago I picked up a copy of T.H. de Dillmont’s Encyclopaedia of Needlework in an antique shop.  My copy doesn’t tell me how old it is, I think it was probably printed in the 1930s.  It was however first published in the late 1800s and it is still possible to get a brand new copy today on Amazon.  It is also widely available on second hand book sites.  This book has a section on Needle Made Laces, and all the stitches are there. 
The chapter has obviously been written for lace makers and there are techniques there that would not convert easily to surface embroidery.  As for the rest, there’s a bundle of them that tend to make one’s fingers itch.  And here’s the thing.  You are only limited by your imagination. 
The other thing that may limit you is learning how to do the stitches.  Let me tell you a little story about that.
I have a 22-year old son who is known to most people as Dude.  Now Dude is an about-to-be qualified cameraman, editor, film maker, whatever.  And he’s quite good at it.  So being his mother I assumed that he would happily do a stitch DVD for me – for which I would pay of course.  Big mistake.  We started it about a year ago.  It was supposed to be ready in March and then it was supposed to be ready in April.  It wasn’t.  Dude was very busy hanging around with his “Chinas” and doing the things which young men do and the old sock’s DVD was unimportant.  I begged, pleaded and threw my toys out of the cot many, many times, then did it all again.  And again. 
It is now early June and today I was finally able to upload it on my website.  There is now a stitch guide with accompanying DVDs, filmed in high definition, with voice overs and all sorts of high tech wonders.  All the needle lace stitches that I have used over the years are on these DVDs and you can find them at http://hazelblomkamp.co.za/online-shop/2012-01-21-14-34-256/06-dvd-stitch-guides.  So if you need help, it’s in those DVDs.
And the dogs?  Well, they came home as the best trained Boxers on the planet, and they live separate lives.  We have installed security doors and expanding gates, along with so much metal fencing, that we can hardly move.  I think you could call it a gilded prison.  For two dogs that were used to sleeping on (and in) the bed, they were settling down to the new regime.  And then.  My husband left a door open this morning and we’re back to square one, with a trip to the vet along the way.  But what do you do?  Just keep going and beg everyone to concentrate.  You couldn’t give one away.  Which one would you choose?
Till next time……………

Posted on

Mixing Embroidery Styles (1)

Mixing Embroidery Styles (1)

In my first blog post I said that you don’t need to know the rules but, rather, the techniques.  There is such a large body of techniques out there, knowledge that has built up over the centuries that we should be using to create our own style of embroidery.  In fact, it might be better to have only a scant knowledge of the various styles of embroidery.  In that way you will be more inclined to see something that inspires you and to mix it into what you might be doing.  Whether or not it is ‘right’ is only a matter of someone else’s opinion.
During the late nineties I bought a book by mistake.  I had only looked at the cover and, thinking it was a book on Stumpwork – which I was playing with at the time – I bought it.  When I got home and pulled it out of its brown paper packet I discovered, to my disappointment, that it was a book on the making of needle lace.  What on earth was I going to do with it?  I’ve never had the desire to make lace.  But, the more I paged through it, the more I loved what I saw and decided to set about working out how I could use it in my embroidery.
Most needle lace techniques are based on detached button stitches put together in an endless series of configurations.  By using back stitches to anchor those detached buttonhole stitches it became possible to use the needle lace techniques as an extension to my repertoire of surface embroidery stitches.
Instead of using, say, trellis couching over satin stitch in Jacobean embroidery I have often used needle lace stitches giving the embroidery a whole new slant, and making it into something very different from what’s out there.
Not a great picture here and I apologise.  My photography skills lag far behind any other skills I may have.  The photograph aside, what I am trying to show you here is how I have used a needle lace technique as a surface embroidery stitch to form the background to a single stump-worked flower and leaves.  It has added interest and made for a more complete design.


Last night I completed a key tassel with a highly embellished cap.  I have used stumpwork and bead embroidery, along with off-loom bead weaving techniques – more of that another day – what I am wanting to show you here is the beaded needle lace that I used to cover the top knob of the cap.  Worked with a perle no. 12 thread and Miyuki beads I have used these techniques to do something that is more akin to lace.  It nevertheless adds texture and interest to the final product.

Over the weeks (months, years?), I am going to keep coming back to the idea of mixing styles to create something new and exciting.  I’m going to encourage you to play and experiment, to look forward instead of recreating what’s been done before.  To add a 21st century slant to an old tradition and, at the same time, keeping those traditions alive.
Next week my life is going to be CHAOTIC. My naughty Boxer dogs – 2 boys – decided that forthwith they intended to have a personality clash and set about fighting to the death.  I got bitten in the process, we had the older one neutered and sent them to Boot Camp – i.e. a private dogs boarding school that has about the same daily rates as the best private boys’ boarding school.  And it’s NOT WORKING!  They have been trained six times a day and are now the most obedient Boxers in the world, but when they are put together they still want to kill each other.  Oh dear.  So, we are separating areas of our garden, buying extra kennels and generally making sure that they will remain apart.  
My son and I will be fetching them – in separate cars – on Monday to start this new regime.  No more long Sunday mornings, all on the bed together.  No more working in my studio with both of them lying at my feet, now it will be one at a time and the other in a separate part of the property.  It all seems to unnecessary, but that’s dogs and you have to go with the flow.  When I got the younger one I was aware that we could encounter this problem, but hoped not.  It’s been happy for two years, but no longer. 
So, with all this going on I hope that I have the inspiration to post something interesting next week! .


Posted on


Embroidery No Longer Taught In Schools.  A Pity?

At the Beating Around The Bush Embroidery Convention held during April 2012, the entries for a worldwide competition were displayed and judged.  The last, and most coveted, award went to the piece of embroidery that had received the most votes in the Viewers’ Choice section.  It was a beautiful wool embroidered quilt, each block a separate Beatrix Potter scene, stitched by Claire Edwards.
When Claire came up to the podium to receive her award, she told us an interesting story.  When she was about 6 or 7 years old and being taught how to embroider at school, the teacher would inspect her pupils work from time to time.  The little girls in the class were made to line up, clutching in their hands the work that they were doing, and a ruler.  Need I go on?  If their stitching wasn’t up to scratch their hands were smacked with the ruler.  Claire received this treatment and, more to the point, has never forgotten it.  As she said, this experience made it all the more incredible that she continued to embroider up to a level where her work is now good enough to win such an award.
I’ve been involved in embroidery for about 25 years and I cannot tell you how many people I have come across who were put off embroidery whilst at school, because of similar treatment from teachers and, so often, nuns at convent schools.  What a pity that is.  Eventually all girls become women who can no longer dash around hockey fields chasing balls, and they will be looking for a more sedentary hobby.  Unless other inspiring influences were present in childhood, many of them will not consider any form of needlework because their school experience put them off for life.
But, you might say, that would have been in the 60s and 70s and things have progressed since then.  Nobody gets smacked anymore.  It’s true that a ruler on the hands has been “ruled out”, but I was unhappy to discover a few years ago that, in essence, things haven’t really changed that much.
My daughter went to a chi-chi girls’ private school, the kind that puts out full-colour brochures claiming to nurture, recognise the individual for what she is……  You know what I’m talking about, all private schools employ similar window dressing tactics.  By and large that was true of the school that she went to, but no school is ever perfect.  In grades 8 and 9 all of the girls were required to do a semester or two of all the subjects that were on offer, after which they chose the 6 or 7 subjects that they would focus on during the last 3 years until they matriculated.
During the six months that she was doing home economics she was required to embroider a gingham embroidery table cloth.  Sadly, the fabric that was provided was a nasty piece of polyester gingham, not even the real thing.  But I digress.  She was required to finish the project during the Michaelmas holidays and spent many enjoyable and relaxing hours stitching.  She’d always been a little scornful of what she called my ‘embroidery effort’ but found herself enjoying what she was doing.  A day or two before the end of the school holidays she said, “actually Mum, I’m beginning to see why you enjoy embroidery”.
On the day school started she hadn’t quite finished.  She had, probably, an hour’s work left to do.  She took it to school and asked the teacher if she could have one more day to complete it.  She did want to complete it.  The teacher told her “no, you hand it in right now and you will lose marks because it wasn’t finished”.  Well, that was it.  The project was never finished, will never be finished and one more person was lost to embroidery.  Teachers don’t seem to realise how one nasty remark or action can put a child off something for life.
I failed needlework at school.  Dismally.  But my highest marks were for Art.  And that’s where I’m going with this.
In the same way that children aren’t, but should be, taught how to fill in a tax return or apply for a mortgage bond in order to equip them for adult life, they should learn how to sew on a button and put up a hem.   Further than that, embroidery should be taught in the art class.   It is not a “domestic” science, it is an art and one of the finest there is.  I can “paint” far more effectively with a needle and thread than I ever could with a paint brush and in the context of school, art teachers are likely to be far more inspiring than home economics teachers ever would be.  There are, of course, some exceptions.
Making young girls do something that they don’t enjoy and find difficult at that stage in their lives is guaranteed to put them off forever, particularly if the teacher is herself unartistic and uninspiring.  Like many other things, it is better to let them try it when they want to.  If the adults in their life are stitching, and enjoying it, they may eventually be inspired.  Then, when they are looking for a hobby they may try it and probably enjoy it for what it is.  Relaxing, therapeutic, creative and for many people, addictive.  It is up to us to design and do projects that are attractive to younger women.
Nothing is ever black and white and one should always consider all the aspects before forming an opinion.  So, is it a pity that embroidery is no longer taught in schools?
On balance, I think not.
Posted on

Hand Embroidery Is To Machine Embroidery…

Hand embroidery is to machine embroidery what home cooked food is to microwave meals.

Threading up a machine, choosing a design from a disc and letting the machine get on with it cannot possibly compare with the rich textures, the variety of threads, the vast body of techniques that have built up over the centuries and the sheer pleasure of hand stitching to the exclusion of everything else that is going on around you.   Machine embroidery does, however, have one advantage.  It has not been around for long enough to have built up a book of rules.
I went to the launch of a book late last year.  This beautiful book was filled with the most exquisite photographs of African wildlife and the launch was attended, by and large, by members of our local camera club.  The venue was set up with numerous large HD television screens and in between the wine and snacks the author gave us a Power Point presentation of the photographs in his book.  The images he had chosen – and there were many of them – were, without exception, pictures that “broke the rules”.  As each slide came up the audience would gasp at its beauty, and he would go on to explain what the “rules” dictated and how, by doing the exact opposite, he had created what was up on the screen, the photograph that took their collective breath away.
He touched on everything from picture composition to focus, from balance to lighting, from exposure to colour.  I stood there, quaffing red wine, thinking oh boy, here is someone who is truly creative and has not allowed himself to be boxed in by the photography police.  A person after my own heart.
What is it about the human race that causes people to want to prescribe to creativity?  Why is it that for centuries the moment someone does something creative there is a whole team out there wanting to create margins and parameters?  Make rules?  Stifle creativity?  There is hardly an art or a craft that has not been subjected to rule making and sadly, hand embroidery might be one of its biggest victims.
A rebel at heart, I am often told that to break the rules you do at least have to know what they are.  Um, no.  I don’t agree.  All you need to know are the techniques.  So called rules only box you in and stop you from exploring your creativity.  That is not to say that you should allow yourself to produce shoddy work.  You should aim for perfection realising, at the same time, that what you are doing is handmade.  That you are human, not a machine.  You do need to take pride in your work and produce the best result that you can.
Take a walk through any shopping mall and go into the clothing and decor shops.  Look at the design on embroidered clothes, accessories, fabrics and soft furnishings.  It is youthful, colourful, fresh and exciting.  We need to be inspired by that.  We need to mix our styles, try out modern fabrics, modern threads, beads, sequins and whatever else we can find.  We need to invent our own techniques and styles without embarrassment, without feeling the need to satisfy the Mother Grundies who disapprove of anything that is not historically correct. 
The human population moves forward all the time and if we want to keep embroidery alive, to make it attractive to the next generation, we need to move forward too.  We must not ignore the vast heritage of embroidery, but we must stop looking back and reproducing what has been done in centuries long gone.
I’m a busy embroiderer, designer, author, teacher, columnist, housewife, mother, dog lover………….and so on.  I can’t promise to post every day or even every week.  I am going to post every time I have something to say.  I intend to be rebellious, informative and inspiring.  I hope that you will join me on this journey.